SITE ACCESS: TEKS Resource System Components > Assessment Center > Create an Assessment Item > Content
VIDEO TUTORIALS:
1.) Text Box Toolbar (Part 1)
2.) Text Box Toolbar (Part 2)
In the Content section, the text boxes provided have a toolbar offering many features that allow you to customize text and/or insert images. A select few that are commonly used are explained below.

COPY/PASTE
In order to paste copied text from elsewhere on your computer into the text box, use the keyboard shortcut, Ctl + V (hold the Control key on your keyboard and then hit the letter ‘V’ key).

FORMAT TEXT
To format any text within the box (e.g., bold, underline, insert bullets, center, right-justify, etc.), click the appropriate icons in the toolbar.

UNDO/REDO
To undo or redo the most recent changes you’ve made within the text box, click the Undo or Redo icon in upper right corner of the toolbar.

SPELL CHECKER
To run the Spell Checker on the text you’ve entered into the box, click the ABC icon in upper left corner of the toolbar.

SUBSCRIPT/SUPERSCRIPT
To create subscript or superscript text, use the Subscript or Superscript icon in the toolbar. Select/highlight the existing text you wish to alter and click the appropriate icon. Alternatively, click the icon first, then type the text and click the icon once more when you are done.

INDENTATIONS
To increase or decrease the indent of a line of text, place the cursor on the line you wish to alter and then click the Increase Indent or Decrease Indent icon in the toolbar.

TEXT COLOR
To alter the color of the text, use the Text Color icon in the toolbar. Select/highlight the existing text you wish to alter and click the appropriate icon. Alternatively, click the icon first, then type the text and click the icon once more when you are done.

BACKGROUND COLOR
To alter the background color of the text, use the Select Background Color icon in the toolbar. Select/highlight the existing text you wish to alter and click the appropriate icon. Alternatively, click the icon first, then type the text and click the icon once more when you are done.

NON-BREAKING SPACE
To insert a non-breaking space character to the text, click the correlating icon in the toolbar. This can be used if you wish to keep two numbers, characters, or words together on the same line (such as a unit associated with a measurement – e.g., 5 cm).

EMOTION ICONS
To insert an emotion icon into the text box, click the Smiley Face icon in the toolbar and select which icon you wish to add.

SPECIAL CHARACTERS
To insert a special character into the text box, click the Special Character icon in the toolbar.

Select the desired special character to insert.

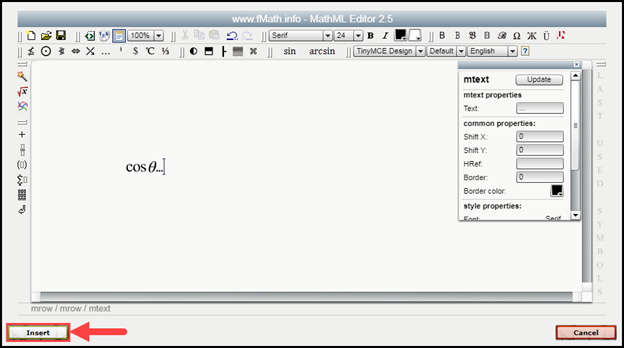
MATH FORMULAS/SYMBOLS
To insert math symbols and/or a math formula into the text box, click the ‘∑’ (sigma/summation) icon in the toolbar. Please note that some web browsers may not display this feature, so trying a different browser may be a viable option.

Make your formula selections and then click the Insert button.
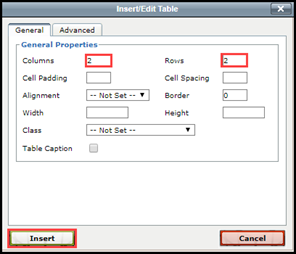
TABLES
To insert a table into the text box, click the Table icon in the toolbar.

Enter the number of Columns and Rows you would like the table to be, and adjust the other parameters (if you wish). Click the Insert button when you are done.
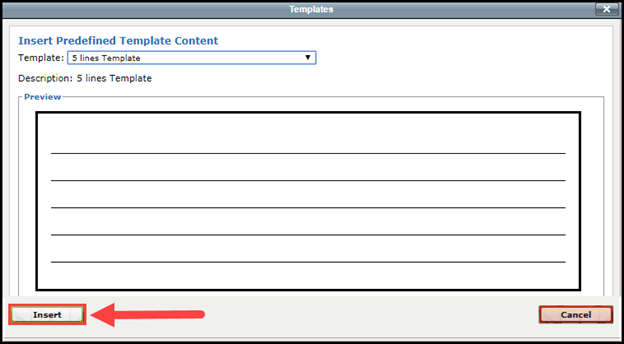
TEMPLATES
To insert a pre-defined template into the text box, click the Template icon in the toolbar (next to Add From My Favorites).

Click the Template drop-down bar and select the desired template.

Click the Insert button.
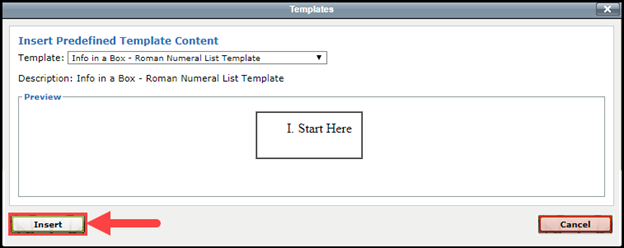
Type text into the template to customize it.

STUDENT WORKSPACE
To insert a student workspace template into the Workspace text box, click the Template icon in the toolbar (next to Add From My Favorites).

Click the Template drop-down bar and select the desired template.
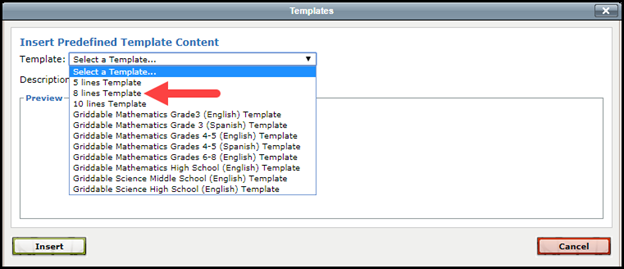
Click the Insert button.
See the Create an Assessment Item: Content > Adding Images support guide for how to insert images into the Content section.